PixelConduit and Final Cut Pro X – first look
Today Finnish company Lacquer updated their Conduit Live product and made it free for Macintosh users. Renamed PixelConduit, it is a video effect development system for motion graphics designers.
It was conceived as a live video performance tool. The application was designed take multiple video sources, apply many complex effects in real time and distribute the results to multiple screens. In recent years, it has been designed for more uses (from the manual at PixelConduit):
– Previewing visual effects on set.
– Theatrical shows and other video-based performances.
– Video installations.
– Compositing and other finishing work.
– Post-production workflow automation.
– Rendering custom graphics in post.
– Live graphics with custom control interfaces, e.g. for TV productions.
In order for real-time video effects to work, the UI metaphor is based on flowcharts that can be quickly manipulated while live video is being fed in:
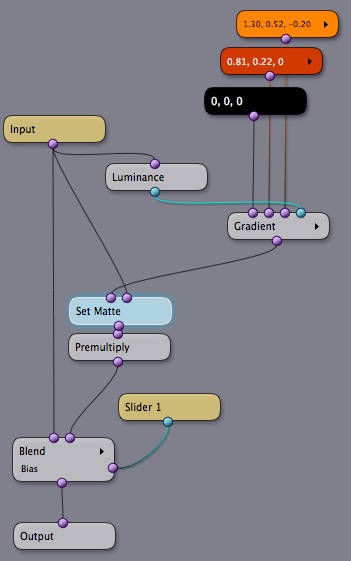
Conduit flowcharts are made of specialised nodes. This flowchart shows a .conduit file that adds an orange tint to the input image.
In this case, the Input node is connected to a live camera. Whichever nodes it is connected to get frames from the camera.
The Gradient node has three Color nodes connected. It usually produces a vertical gradient between three colours.
The Luminance node takes a picture from the Input node and converts it to monochrome based on it’s luminance.
When the Gradient node also has a greyscale image connected to its fourth input, it renders the greyscale image based on the colours in the gradient (the black pixels in the source image as the first colour, ranging up to the white pixels as the third colour).
So, in this case, the camera input has been fully colourised based on shades of orange (the three input colours to the gradient).
I’ll come back to the Set Matte and Premultiply nodes later.
The Slider 1 node passes in the value of a slider that is manipulated live.
The Blend node takes two images and overlays one on the other using a transparency value based on the value from the slider. In this case, the amount of orange tinting is controlled by how transparent the fully colourised version of the source is when overlayed on the original input video.
The Output node then sends the result to the screen of your choice.
PixelConduit has evolved to be used for non-live video. This kind of flowchart can be applied to video clips in editing software timelines.
Instead of a live camera connected to the Input node, the video of a Final Cut Pro timeline clip is sent into the flowchart. The Slider node is connected to a control in the Final Cut Inspector. The Output node sends the result back to the Final Cut Pro timeline.
This is why the Set Matte and Premultiply nodes are needed. They take the transparent pixels in the source video clip and apply the same transparency to the gradient colourised copy of the source clip. If this wasn’t done, the transparent parts of the timeline clip would be blended with the black parts of the colourised version.
PixelConduit and Apple Motion users
PixelConduit is aimed at Apple Motion users who know how to create effect templates for use in Final Cut. The underlying framework that makes Conduit files play in Mac apps such as Motion and Final Cut is called the Conduit Effect System.
To create Conduit Effect System-based effects in Motion, apply the ‘Conduit’ effect to a layer:

Then click the Show Conduit Editor button to create a new .conduit file

Add nodes to the flowchart by dragging them from the left-hand palette.
Here I’ve added some nodes and am dragging a Luminance node into the editor:

To connect one node to the other, drag from the output connector of the start node to the input connector of the destination node.
Once you’re happy with your Conduit, close the editor window and choose how to connect your new Conduit to your Motion template. A single Conduit filter applied to a layer can have eight slider inputs. You can have up to seven image inputs. These inputs can be Motion clips or layers. There also four colour pickers. As well as connecting these inputs to Motion elements, you can also publish them to Final Cut Pro, so editors can manipulate them directly.
Once you are happy with your PixelConduit-enabled effect you can save it and make it available in Final Cut Pro X.
There is more detailed PDF on creating effects in Motion 5 for Final Cut Pro X using the Conduit Effect System from the PixelConduit website.
PixelConduit and Final Cut Pro users
The vast majority of Final Cut users won’t be spending their time creating Conduit files to use to solve editing problems. However now that the Conduit Effect System and the PixelConduit applications are free, it might usher in a whole new set of plug-ins from ‘fourth-parties’ (people who use third-party tools to make products).
You can download sample Final Cut Pro plug-ins from the PixelConduit website.

You don’t need to download the PixelConduit 3.0 application, the plug-ins download includes the sample effects and frameworks that add the Conduit Editor window to Motion and Final Cut. You can also use Motion to take a look at how the sample effects were implemented as Motion templates (The Conduit plug-ins that appear in Final Cut Pro aren’t installed in the Motion Templates folder, but in Library/Application Support/Final Cut Pro/Templates instead).
Bug
Due to an Apple bug in Final Cut Pro X 10.0.6 and 10.0.7, when these effects render sometimes there are random frames when the image is tinted and flipped upside down. There’s nothing that Lacquer can do about this – it will only be fixed if Apple deals with the bug in a future version of Final Cut Pro.
In the next post I’ll investigate the advantages that PixelConduit has over creating effects using Motion.

Pingback: PixelConduit – бесплатный констрктор эффектов для FCPX « В и Ко (видеомонтаж и композитинг)
Haven´t done a lot of testing yet, but in my case, it works with FCPX 10.0.7. I´ve always been interested in Conduit, but it has always been a bit unstable. Now that it´s free I hope it will have a great success and more updates.
It´s an amazing software for free.
I have tried in FCPX 10.0.7 and you are right Alex, Final Cut stops working. Hope there is a solution soon.
Saludos Jesus!
The effects can be applied, but clicking the ‘Open Conduit Editor’ control in one effect crashes Final Cut Pro 10.0.7
FCP X 10.0.7, Mac OS X 10.8.2, MacBook Air i5-1.6/4Gb 2011.
Effect applied and work. ‘Open in Motion’ also work, but can’t find ‘Open Conduit Editor’, where is?
In Motion, find the layer with Conduit applied. Use the large ‘Show in Conduit Editor‘ at the top of the inspector. The ‘Open Conduit Editor…’ check box there is designed to be published to Final Cut Pro.
Alex said: In Motion, find the layer with Conduit applied. Use the large ‘Show in Conduit Editor‘ at the top of the inspector. The ‘Open Conduit Editor…’ check box there is designed to be published to Final Cut Pro.
Yes, also after publishing ‘Open Conduit Editor…’ crashes FCP X. 😦
Pingback: Вышла новая версия PixelConduit — конструктора эффектов для FCPX